Setting up Home Assistant with openSUSE MicroOS on a Raspberry Pi
openSUSE MicroOS is a small operating system designed to run container workloads. It features a read only root partition, transactional updates which allow for easy rollbacks thereby making it highly resilient and perfect for running small IoT devices.
Home Assistant can be run very easily from within a container preferably on a system requiring as little maintenance as possible. This makes MicroOS the perfect operating system for deploying Home Assistant.
In this guide, we will show how to install MicroOS on your Raspberry Pi, configure it with ignition and deploy Home Assistant using podman and systemd.
You will need the following hardware:
- Raspberry Pi 4 + Power Supply
- Micro SD-Card
- USB drive
- PC with a SD-Card reader and a Micro SD Adapter
- Ethernet cable
This guide will assume that your PC is running Linux. You can perform most of these steps on Windows or MacOS, but some of the commands will require adjustment.
Download the latest MicroOS image (aarch64 variant, Base System + Container Runtime Environment) from download.opensuse.org
Insert the SD Card into your PC and find out which device name corresponds to it, e.g. via
udiskctl statusorlsblk:
 ❯ udisksctl status
MODEL                     REVISION  SERIAL               DEVICE
--------------------------------------------------------------------------
ADATA SX8200PNP           42G1TBKA  2L08294NSJU9         nvme0n1
ST2000LM007-1R8174        SDM2      WDZG289H             sda
SE32G                               0x0f6986e5           mmcblk0

 ❯ # The micro SD Card would be mmcblk0
- Flash the downloaded image to the correct device. Double check the correct path or you might accidentally overwrite important data!
 ❯ xzcat /path/to/download/folder/openSUSE-MicroOS.aarch64-ContainerHost-RaspberryPi.raw.xz | \
       dd bs=4M of=/dev/mmcblk0 iflag=fullblock oflag=direct status=progress
# wait a bit
 ❯ sync
- Grab the spare USB drive and either create a new partition on it with the
label
ignitionor relabel the existing partition asignition(e.g. viagparted). Create a directory calledignitionin the root directory of the USB drive and put the fileconfig.ignwith the following contents into it:
{
  "ignition": { "version": "3.0.0" },
  "passwd": {
    "users": [
      {
        "name": "root",
        "sshAuthorizedKeys": [
          "ssh-rsa insertYourPublicKeyHere"
        ]
      }
    ]
  }
}
Replace the line ssh-rsa insertYourPublicKeyHere with your preferred ssh
public key that you can find in ~/.ssh/id_*.pub.
Unmount the SD-Card and the USB drive, insert both into your Raspberry Pi, connect it to your local network using an Ethernet cable and power it on.
Get the IP address of your Raspberry Pi. You can use your router’s web interface for this (if you have access to it). Alternatively, you can scan all PCs in your local network using nmap:
 ❯ nmap -p22 -v 192.168.1.* # adjust to your IP range
 # lots of output...

Nmap scan report for 192.168.1.107
Host is up (0.00018s latency).

PORT   STATE SERVICE
22/tcp open  ssh
MAC Address: B8:27:EB:64:2C:20 (Raspberry Pi Trading)
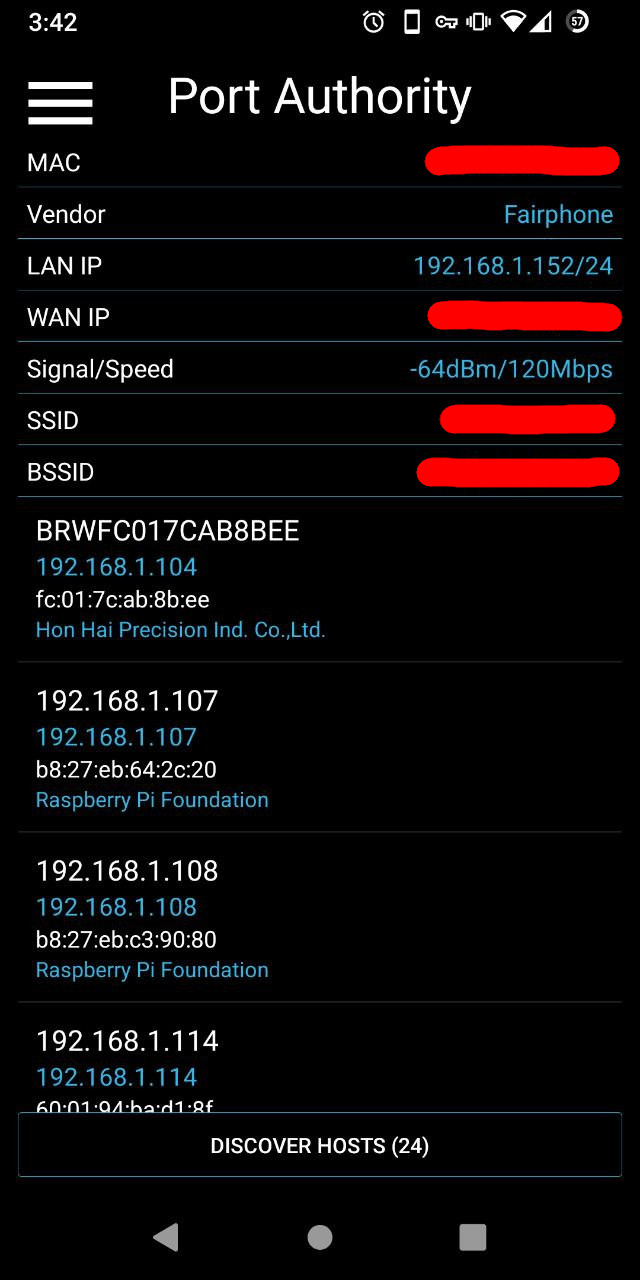
Or use any other port scanner, e.g. PortAuthority for Android:
- Log in to your Pi and update all packages:
 ❯ ssh root@$RPI_IP_HERE
localhost:~ # transactional-update
Checking for newer version.
transactional-update 4.0.0~rc4 started
Options:
Separate /var detected.
2022-08-18 13:35:48 tukit 4.0.0~rc4 started
2022-08-18 13:35:48 Options: -c1 open
2022-08-18 13:35:48 Using snapshot 1 as base for new snapshot 2.
2022-08-18 13:35:48 No previous snapshot to sync with - skipping
ID: 2
2022-08-18 13:35:49 Transaction completed.
Calling zypper up
zypper: nothing to update
Removing snapshot #2...
2022-08-18 13:35:52 tukit 4.0.0~rc4 started
2022-08-18 13:35:52 Options: abort 2
2022-08-18 13:35:52 Discarding snapshot 2.
2022-08-18 13:35:52 Transaction completed.
transactional-update finished
localhost:~ # reboot # only if packages were actually updated
We will now setup Home Assistant to be run via podman in a systemd unit and optionally enable automatic updates of the container image.
Log in to the Raspberry Pi and proceed as follows:
- Create a directory for Home Assistant’s configuration files and database and switch to it:
 ❯ ssh root@$RPI_IP_HERE
localhost:~ # mkdir -p /path/to/conf/dir
localhost:~ # podman run -d -v /path/to/conf/dir:/config:Z \
      -v /etc/localtime:/etc/localtime:ro \
      --privileged --network=host \
      --name=homeassistant \
      --label "io.containers.autoupdate=registry" \
      ghcr.io/home-assistant/home-assistant:stable
- Create a systemd unit using podman and enable it at startup. Now Home Assistant will be automatically started whenever the Raspberry Pi is rebooted.
localhost:~ # podman generate systemd --new homeassistant > \
                  /etc/systemd/system/homeassistant.service
localhost:~ # podman stop homeassistant
homeassistant
localhost:~ # systemctl daemon-reload
localhost:~ # systemctl enable --now homeassistant
Created symlink /etc/systemd/system/default.target.wants/homeassistant.service → /etc/systemd/system/homeassistant.service.
- Depending on your preferences, you can enable automatic updates of the Home
Assistant container image using podman’s
auto-update
command. podman will pull a new version of all images with the label
io.containers.autoupdateset toregistryevery timepodman auto-updateis run. You can either runpodman auto-updateyourself whenever you consider safe to do or let systemd perform the update periodically by enabling thepodman-auto-update.timer:
localhost:~ # systemctl enable --now podman-auto-update.timer
Created symlink /etc/systemd/system/timers.target.wants/podman-auto-update.timer → /usr/lib/systemd/system/podman-auto-update.timer.
Home Assistant is now running on your Raspberry Pi and you can go through the onboarding process.
We have only scratched the surface of what can be achieved with MicroOS as a host operating system. There are multiple areas where this setup can be improved further:
- Leverage (health-checker)[https://github.com/openSUSE/health-checker] to verify whether Home Assistant is able to launch with a new snapshot.
- Use ignition to its full potential and setup Home Assistant completely automated via ignition.
- Setup proper monitoring
There is a lot to tinker with, so go and check out the MicroOS Portal in the openSUSE Wiki to find out more.