elemental
Image Customization
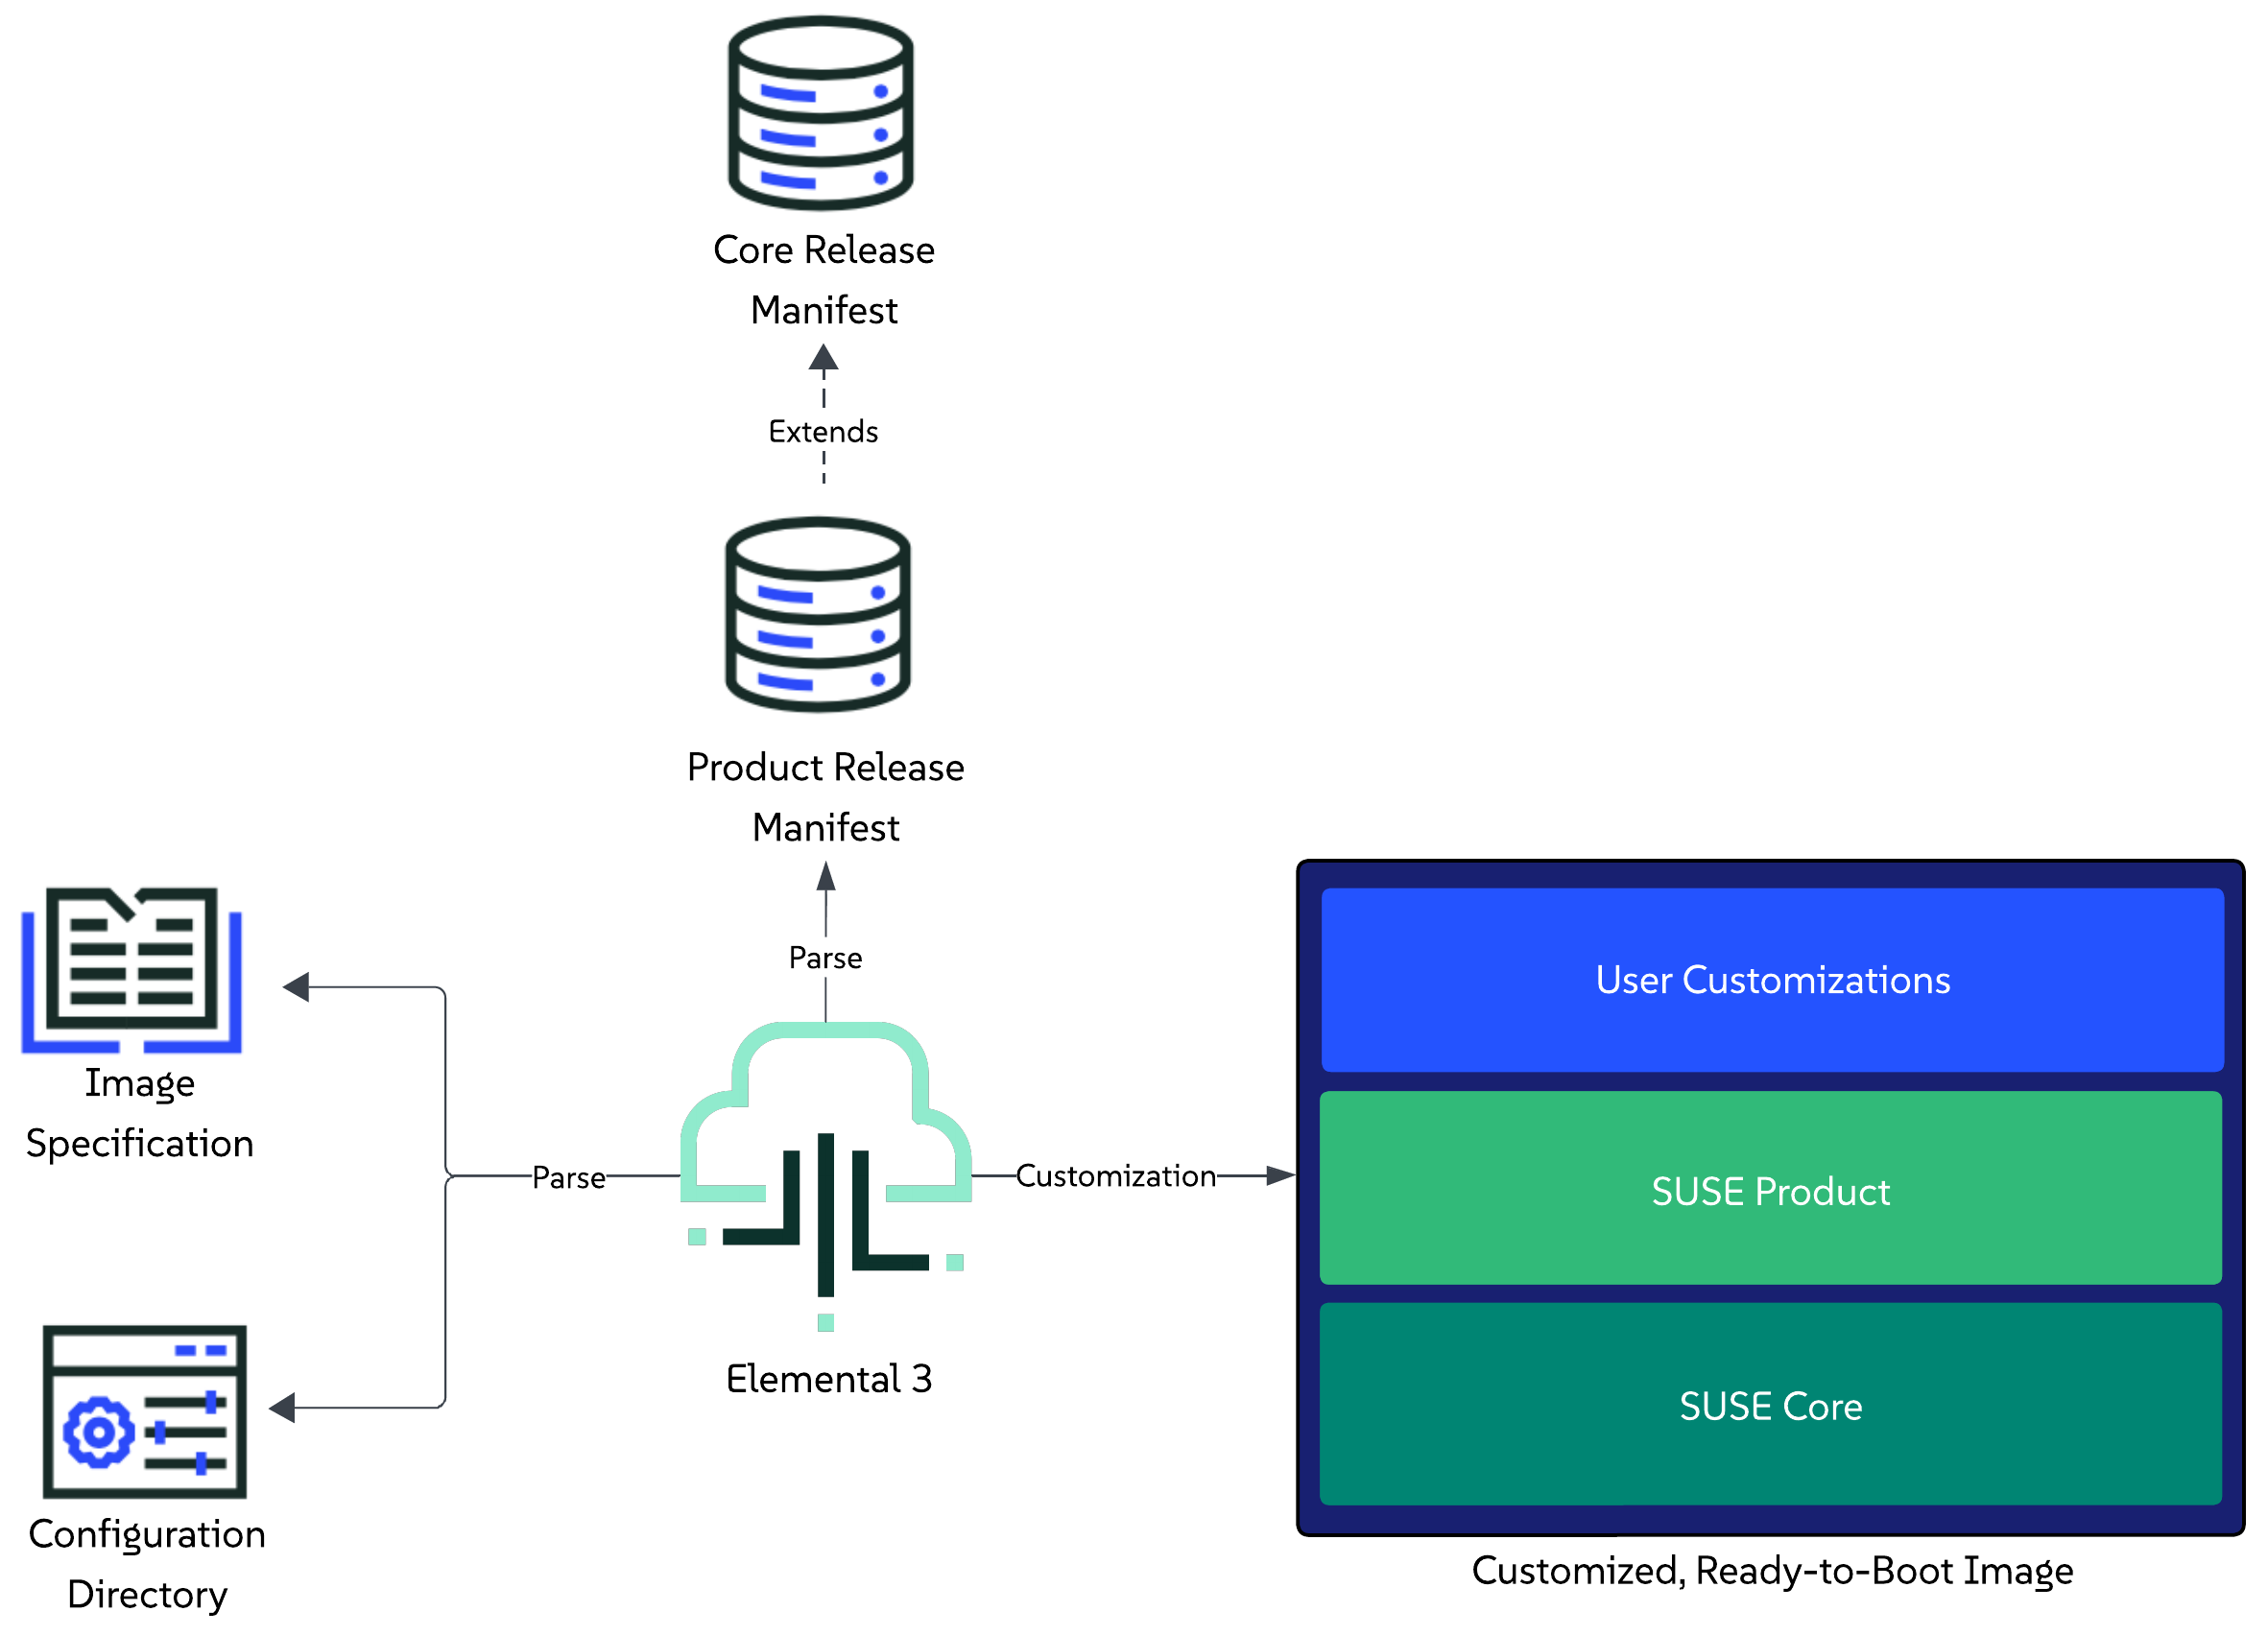
This section provides an overview of how the elemental3 command-line interface enables users to customize and extend an image that is based on a specific set of components defined in a release manifest.
For general information about the customization process, refer to the Customization Process section.
For information on how to boot a customized image, refer to the Booting a customized image section.
For real-life examples, refer to the Examples section.
Customization Process
The customization process is executed through the elemental3 customize command.
As part of the command, users are expected to provide:
- Specifications for the image - these are defined as options to the command itself. Available specification options can be viewed by calling the command’s help message:
elemental3 customize -h. - Information about the desired state of the image - this is done through the definition of a configuration directory that the user creates beforehand. For more information on the directory itself, refer to the Configuration Directory Guide.
Please familiarize yourself with both points before attempting to customize your first image.
For further understanding of the customization process, you can also refer to the following sections:
- Limitations - for any limitations that the process might have.
- Overview - for a high-level description of the steps that the customization process goes through.
- Execution - for supported methods to trigger the customization process.
Limitations
Currently, the image customization process has the following limitations:
- Supports customizing images only for
x86_64platforms. - Supports customizing images for connected (non air-gapped) environments only.
Elemental is in active development, and these limitations will be addressed as part of the product roadmap.
Overview
NOTE: The user is able to customize Linux-only images by excluding Kubernetes resources and deployments from the configuration directory (regardless of whether this is under
kubernetes/manifests,kubernetes/cluster.yamlorrelease.yaml). This is currently an implicit process, but it is possible that an explicit option for it (e.g. a flag) is added at a later stage.
This section provides a high-level overview of the steps that Elemental’s tooling goes through in order to produce a customized and extended image.
Steps:
- Parse the user provided image specifications.
- Parse the configuration directory that the user has defined in the image specification.
- Parse the solution release manifest that the user has defined as a release reference in the
release.yamlfile of the configuration directory. - Pull and parse the core platform release manifest that the aforementioned solution manifest extends.
- Begin the customization process:
- Unpack the pre-built installer ISO that is defined in the
core platformrelease manifest. - Prepare for Kubernetes cluster creation and resource deployment:
- Prepare Helm charts and Kubernetes manifests
- Download RKE2 artifacts (tarball, images, checksums) and install script for air-gapped installation.
- Prepare any other overlays or firstboot configurations based on what was defined in the configuration directory.
- Produce a description of the desired installation state and merge it with the installer ISO description.
- Produce the final desired image type.
- Unpack the pre-built installer ISO that is defined in the
- Mark customization as completed.
Execution
Starting the customization process can be done either by directly working with the elemental3 binary, or by using the elemental3 container image. Below you can find the minimum set of options for running both use cases.
Binary
sudo elemental3 customize --type <raw/iso> --config-dir <path>
IMPORTANT: The above process is long running, as it involves pulling multiple component images over the network. For a quicker execution, use locally pulled container images in combination with the
--localflag.
Unless configured otherwise, after execution, the resulting ready-to-boot image will reside in the configuration directory path and use the image-<timestamp>.<image-type> naming format.
NOTE: You can specify another path for the output using the
--output (-o)option, however, be mindful if running Elemental 3 from a container, as it would require including the mounted configuration directory as a prefix (e.g. –output /config/).
Container image
NOTE: This section assumes you have pulled the
elemental3container image and referenced it in theELEMENTAL_IMAGEvariable.
Run the customization process:
- For a RAW disk image:
podman run -it -v <PATH_TO_CONFIG_DIR>:/config $ELEMENTAL_IMAGE customize --type raw - For ISO media:
podman run -it -v <PATH_TO_CONFIG_DIR>:/config $ELEMENTAL_IMAGE customize --type iso
IMPORTANT: The above process is long running, as it involves pulling multiple component images over the network. For a quicker execution, use locally pulled container images in combination with mounting the podman socket to the
elemental3container image and specifying the--localflag:
- Start Podman socket:
systemctl enable --now podman.socket- Run the
elemental3container with the mounted podman socket:podman run -it -v <PATH_TO_CONFIG_DIR>:/config -v /run/podman/podman.sock:/var/run/docker.sock $ELEMENTAL_IMAGE customize --type <raw/iso> --local
Unless configured otherwise, the above process will produce a customized RAW or ISO image under the specified <PATH_TO_CONFIG_DIR> directory.
Booting a customized image
NOTE: The below RAM and vCPU resources are just reference values, feel free to tweak them based on what your environment needs.
The customized image can be booted as any other regular image. Below you can find an example of how this can be done by using Libvirt to setup a virtual machine from a customized image that has a static network configured for machines with the FE:C4:05:42:8B:01 MAC address.
-
RAW disk image:
virt-install --name customized-raw \ --ram 16000 \ --vcpus 10 \ --disk path="<customized-image-path>",format=raw \ --osinfo detect=on,name=sle-unknown \ --graphics none \ --console pty,target_type=serial \ --network network=default,model=virtio,mac=FE:C4:05:42:8B:01 \ --virt-type kvm \ --import \ --boot uefi,loader=/usr/share/qemu/ovmf-x86_64-ms-code.bin,nvram.template=/usr/share/qemu/ovmf-x86_64-ms-vars.bin -
ISO media:
-
Create an empty
disk.imgdisk image that will be used as a storage device:truncate -s 20G disk.img -
Create a local copy of the EFI variable store:
NOTE: This is needed in order to persist any new EFI entries included during the ISO installer boot.
cp /usr/share/qemu/ovmf-x86_64-vars.bin . -
Boot a VM using the previously created resources, namely the
customized.iso,disk.imgand local EFI store:
virt-install --name customized-iso \ --ram 16000 \ --vcpus 10 \ --import \ --disk path=disk.img,format=raw \ --cdrom "customized.iso" \ --boot loader=/usr/share/qemu/ovmf-x86_64-code.bin,loader.readonly=yes,loader.type=pflash,nvram=ovmf-x86_64-vars.bin \ --graphics none \ --console pty,target_type=serial \ --network network=default,model=virtio,mac=FE:C4:05:42:8B:01 \ --osinfo detect=on,name=sle-unknown \ --virt-type kvm -
Examples
NOTE: All examples in this section run with FIPS enabled by default. To disable it, simply remove the
cryptoPolicyconfiguration from the correspondinginstall.yamlfile.
This section aims at providing real-life examples of the image customization process, as described in the “Customization Process” section.
IMPORTANT: Before proceeding with the examples below, make sure you have familiarized yourself with the necessary prerequisites.
The examples will showcase how you can use the elemental3 container image to achieve the following customization use cases:
Prerequisites
- A server or virtual machine running Tumbleweed, Leap 16.0, Leap Micro 6.2, SLES 16 or SUSE Linux Micro 6.2, with a minimum x86_64-v2 instruction set.
- Some other packages can also be needed if you want to compile the binaries yourself:
git-core go make mtools squashfs xorriso.
Linux only image
Use case
A user wants to customize and produce a RAW image that is based on a specific Core Platform version.
Additionally, the user wants to enable compliance with FIPS, configure the image’s network and extend the environment with a custom systemd service tailored to their specific use case.
Configuration directory setup
The user creates a configuration directory that describes the desired configurations that need to be applied over the desired Core Platform release.
The contents of this directory include:
- install.yaml - specifies which
bootloaderandkernel command linearguments to apply during the OS installation process, along with the image’sdisk sizeand desired FIPS policy setting. - butane.yaml - specifies a butane configuration that describes the user that will be created and used for login, as well as the custom systemd service that is required by the example use case.
- release.yaml - specifies the desired
Core Platformrelease that will be customized and extended. - network/example-libvirt.yaml - specifies custom network configuration that ensures that a machine with a given MAC will be assigned a statically defined IP address.
Producing the customized image
-
Navigate to your configuration directory:
cd examples/elemental/customize/linux-only/ -
Following the steps for executing the customization process through a container image using locally pulled images, run the process for the desired RAW type:
NOTE: This command assumes that the Podman socket was started and the
$ELEMENTAL_IMAGEpoints to a validelemental3container image.podman run -it -v .:/config -v /run/podman/podman.sock:/var/run/docker.sock $ELEMENTAL_IMAGE customize --type raw --local
After execution, for a RAW disk type, your examples/elemental/customize/linux-only directory should look similar to:
.
├── butane.yaml
├── image-2025-12-11T12-19-06.raw        <- created by the customization process
├── image-2025-12-11T12-19-06.raw.sha256 <- created by the customization process
├── install.yaml
├── network/
└── release.yaml
Booting the image
Following what is described in the “Booting a customized image” section, you boot a virtual machine using Libvirt:
virt-install --name linux-only-example \
             --ram 16000 \
             --vcpus 10 \
             --disk path="<customized-image-path>",format=raw \
             --osinfo detect=on,name=sle-unknown \
             --graphics none \
             --console pty,target_type=serial \
             --network network=default,model=virtio,mac=FE:C4:05:42:8B:01 \
             --virt-type kvm \
             --import \
             --boot uefi,loader=/usr/share/qemu/ovmf-x86_64-ms-code.bin,nvram.template=/usr/share/qemu/ovmf-x86_64-ms-vars.bin
NOTE: Based on the
FE:C4:05:42:8B:01MAC address, during first boot this will apply the network configuration defined in the network/example-libvirt.yaml file on the machine.
Environment overview
Once the machine has successfully been booted with the customized image, you can verify the environment by going through the following set of steps:
-
Verify that the expected operating system is running:
cat /etc/os-release -
Verify the custom network configuration has been applied:
ip a -
Verify the machine’s hostname:
NOTE: If you have defined a MAC address that matches one of the network configuration files defined under the network/ directory, the hostname will be set to the name of that file.
cat /etc/hostname -
Verify the disk size of the machine:
df -Th -
Verify the environment is FIPS compliant:
fips-mode-setup --check # Example output FIPS mode is enabled. Initramfs fips module is enabled. The current crypto policy (FIPS) is based on the FIPS policy -
Verify that the custom systemd service has been executed:
journalctl -u example.service
Single-node Kubernetes cluster
Use case
A consumer has created a release manifest for their solution that extends a specific Core Platform version with additional components, namely Rancher and cert-manager.
A user wants to customize and produce a RAW image that will be running an operating system, Kubernetes distribution and Rancher version that are supported by the aforementioned consumer solution.
Furthermore, using this image, the user wants to enable compliance with FIPS and setup a single-node Kubernetes cluster that will be extended with the NeuVector Helm chart along with a specific set of Kubernetes manifests that will enable access to the Rancher UI.
Configuration directory setup
The user creates a configuration directory that describes the desired configurations that need to be applied over the desired Solution release.
The contents of this directory include:
- install.yaml - specifies which
bootloaderandkernel command linearguments to apply during the OS installation process, along with the image’sdisk sizeand desired FIPS policy setting. - butane.yaml - specifies a butane configuration that defines the user that will be used to log into the booted system.
- kubernetes/cluster.yaml - specifies the user-desired
NeuVectorHelm chart as well as a remote manifest for the local-path-provisioner. - release.yaml - specifies the reference to the desired solution. From this solution release, enable the desired Kubernetes distribution, as well as
RancherandMetalLB. - suse-solution-manifest.yaml - example for a
Solutionrelease manifest that the user has referred in therelease.yamlconfiguration file. - kubernetes/helm/values/rancher.yaml - custom values for the
RancherHelm chart that the user has enabled from theSolutionrelease manifest. - kubernetes/manifests/ip-pool.yaml - local manifest to apply to the cluster and have the enabled
MetalLBcomponent setup anIPAddressPool. - kubernetes/manifests/l2-adv.yaml - local manifest to apply to the cluster and have the enabled
MetalLBcomponent setup aL2Advertisement. - kubernetes/manifests/rke2-ingress-config.yaml - local manifest that will edit the existing
rke2-ingress-nginxHelm chart and will enable its service to be of typeLoadBalancer. - network/single-node-example.yaml - custom network configuration that sets up a static IP for machines with the
FE:C4:05:42:8B:01MAC address.
Producing the customized image
-
Navigate to your configuration directory:
cd examples/elemental/customize/single-node/ -
Following the steps for executing the customization process through a container image using locally pulled images, run the process for the desired RAW type:
NOTE: This command assumes that the Podman socket was started and the
$ELEMENTAL_IMAGEpoints to a validelemental3container image.podman run -it -v .:/config -v /run/podman/podman.sock:/var/run/docker.sock $ELEMENTAL_IMAGE customize --type raw --local
After execution, for a RAW disk type, your examples/elemental/customize/single-node/ directory should look similar to:
.
├── butane.yaml
├── image-2025-12-11T12-19-06.raw        <- created by the customization process
├── image-2025-12-11T12-19-06.raw.sha256 <- created by the customization process
├── install.yaml
├── kubernetes/
├── network/
├── release.yaml
└── suse-solution-manifest.yaml
Booting the image
Following what is described in the Booting a customized image section, you boot a virtual machine using Libvirt:
virt-install --name single-node-example \
             --ram 16000 \
             --vcpus 10 \
             --disk path="<customized-image-path>",format=raw \
             --osinfo detect=on,name=sle-unknown \
             --graphics none \
             --console pty,target_type=serial \
             --network network=default,model=virtio,mac=FE:C4:05:42:8B:01 \
             --virt-type kvm \
             --import \
             --boot uefi,loader=/usr/share/qemu/ovmf-x86_64-ms-code.bin,nvram.template=/usr/share/qemu/ovmf-x86_64-ms-vars.bin
NOTE: Based on the
FE:C4:05:42:8B:01MAC address, during first boot this will apply the network configuration defined in the network/single-node-example.yaml file on the machine.
Environment overview
Once the machine has successfully been booted with the customized image, you can verify the environment by going through the following set of steps:
-
Verify that the expected operating system is running:
cat /etc/os-release -
Verify the custom network configuration has been applied:
ip a -
Verify the machine’s hostname:
cat /etc/hostname -
Verify the environment is FIPS compliant:
fips-mode-setup --check # Example output FIPS mode is enabled. Initramfs fips module is enabled. The current crypto policy (FIPS) is based on the FIPS policy -
Setup
kubectl:alias kubectl='KUBECONFIG=/etc/rancher/rke2/rke2.yaml /var/lib/rancher/rke2/bin/kubectl' -
Verify cluster node:
kubectl get nodes -o wide # Example output NAME STATUS ROLES AGE VERSION INTERNAL-IP EXTERNAL-IP OS-IMAGE KERNEL-VERSION CONTAINER-RUNTIME single-node-example Ready control-plane,etcd 3m18s v1.34.2+rke2r1 192.168.122.251 <none> SUSE Linux Enterprise Server 16.0 6.12.0-160000.6-default containerd://2.1.5-k3s1 -
Verify that the Core Platform enabled
MetalLBcomponent is running:kubectl get pods -n metallb-system # Example output NAME READY STATUS RESTARTS AGE metallb-controller-6b59fb78f4-fk6wq 1/1 Running 0 13m metallb-speaker-w9gtc 4/4 Running 0 13m -
Verify solution enabled Helm chart components:
-
NeuVector:
kubectl get pods -n neuvector-system # Example output NAME READY STATUS RESTARTS AGE neuvector-cert-upgrader-job-ntj2d 0/1 Completed 0 9m4s neuvector-controller-pod-79bb56d6c4-dmxmx 1/1 Running 0 11m neuvector-controller-pod-79bb56d6c4-lq2p8 1/1 Running 0 11m neuvector-controller-pod-79bb56d6c4-xjrk2 1/1 Running 0 11m neuvector-enforcer-pod-wmlqx 1/1 Running 0 11m neuvector-manager-pod-987b84867-4k88j 1/1 Running 0 11m neuvector-scanner-pod-d8bf5677d-6k6tf 1/1 Running 0 11m neuvector-scanner-pod-d8bf5677d-hnxfk 1/1 Running 0 11m neuvector-scanner-pod-d8bf5677d-s67zh 1/1 Running 0 11m -
Rancher:
 kubectl get pods -n cattle-system

 # Example output
 NAME                                        READY   STATUS      RESTARTS   AGE
 rancher-66b9664747-j2sfp                    1/1     Running     0          36m
 rancher-webhook-7748c7b4bf-42xg4            1/1     Running     0          22m
 system-upgrade-controller-67f899b56-rzcqh   1/1     Running     0          21m
-
-
Verify that the custom
RancherHelm chart values defined underkubernetes/helm/values/rancher.yamlhave been propagated to therancherHelmChart resource:kubectl get helmchart rancher -n kube-system -o jsonpath='{.spec.valuesContent}' # Example output bootstrapPassword: admin1234 hostname: 192.168.122.15.sslip.io replicas: 1 -
Verify that the manifests from the
kubernetes/manifestsdirectory have been applied:-
MetalLB
IPAddressPoolresource:kubectl get ipaddresspools -A # Example output NAMESPACE NAME AUTO ASSIGN AVOID BUGGY IPS ADDRESSES metallb-system ingress-ippool true false ["192.168.122.15/32"] -
MetalLB
L2Advertisementresource:kubectl get l2advertisements -A # Example output NAMESPACE NAME IPADDRESSPOOLS IPADDRESSPOOL SELECTORS INTERFACES metallb-system ingress-l2-adv ["ingress-ippool"] -
RKE2 NGINX Ingress controller service is available, of type
LoadBalancerand running on the192.168.122.15IP:kubectl get svc rke2-ingress-nginx-controller -n kube-system # Example output NAME TYPE CLUSTER-IP EXTERNAL-IP PORT(S) AGE rke2-ingress-nginx-controller LoadBalancer 10.43.117.57 192.168.122.15 80:30594/TCP,443:32133/TCP 42m
-
Multi-node Kubernetes cluster
Use case
A consumer has created a release manifest for their solution that extends a specific Core Platform version with additional components, namely Rancher and cert-manager.
A user wants to customize and produce a RAW image that will be running an operating system, Kubernetes distribution and Rancher version that are supported by the aforementioned consumer solution.
Furthermore, using this image, the user intends to set up a multi-node Kubernetes cluster in which all nodes, both control-plane and worker, are FIPS compliant. The cluster will also be extended with the NeuVector Helm chart, along with a set of Kubernetes manifests that enable access to the Rancher UI.
Configuration directory setup
The user creates a configuration directory that describes the desired configurations that need to be applied over the desired Solution release.
The contents of the directory are the same as the contents for a single-node Kubernetes setup, with the following additions:
- network/ - add network configuration for each desired node. This example configures the static IPs
192.168.122.250,192.168.122.251,192.168.122.252and192.168.122.253for machines with the respectiveFE:C4:05:42:8B:01,FE:C4:05:42:8B:02,FE:C4:05:42:8B:03andFE:C4:05:42:8B:04MAC addresses. - kubernetes/config/agent.yaml - add configuration for the agent node.
- kubernetes/config/registries.yaml - add configuration for the embedded private registry. This example sets the embedded spegel registry to cache images from registry.suse.com. This way images such as the OS image is pulled only once from the remote registry during upgrades.
- kubernetes/cluster.yaml - add multi-node cluster configuration that specifies the node’s roles as well as the cluster’s network setup.
Producing the customized image
-
Navigate to your configuration directory:
cd examples/elemental/customize/multi-node/ -
Following the steps for executing the customization process through a container image using locally pulled images, run the process for the desired RAW type:
NOTE: This command assumes that the Podman socket was started and the
$ELEMENTAL_IMAGEpoints to a validelemental3container image.podman run -it -v .:/config -v /run/podman/podman.sock:/var/run/docker.sock $ELEMENTAL_IMAGE customize --type raw --local
After execution, for a RAW disk type, your examples/elemental/customize/multi-node/ directory should look similar to:
.
├── butane.yaml
├── image-2025-12-11T12-19-06.raw        <- created by the customization process
├── image-2025-12-11T12-19-06.raw.sha256 <- created by the customization process
├── install.yaml
├── kubernetes/
├── network/
├── release.yaml
└── suse-solution-manifest.yaml
Booting the image
NOTE: This section assumes that each node will be booted using a copy of the produced
customized.rawimage as disk.
Following what is described in the “Booting a customized image” section, for each desired node, you boot a virtual machine using the following template:
virt-install --name <machine-name> \
             --ram 16000 \
             --vcpus 10 \
             --disk path="<copy-of-customized-raw>",format=raw \
             --osinfo detect=on,name=sle-unknown \
             --graphics none \
             --console pty,target_type=serial \
             --network network=default,model=virtio,mac=<node-MAC> \
             --virt-type kvm \
             --import \
             --boot uefi,loader=/usr/share/qemu/ovmf-x86_64-ms-code.bin,nvram.template=/usr/share/qemu/ovmf-x86_64-ms-vars.bin
Where:
<machine-name>is the name of the machine as seen byvirsh list.<copy-of-customized-raw>is a copy of the producedcustomized.rawdisk that will be specific for this machine.<node-MAC>is the MAC address for the desired node, as defined in both kubernetes/cluster.yaml and network/.
Environment overview
Much of the environment validation is the same as for the single-node Kubernetes cluster environment with following validation additions:
-
Validate endpoint-copier-operator is deployed:
kubectl get pods -n endpoint-copier-operator # Example output NAME READY STATUS RESTARTS AGE endpoint-copier-operator-695f9b84f6-lcvmw 1/1 Running 1 (17m ago) 19m endpoint-copier-operator-695f9b84f6-z5sk7 1/1 Running 0 19m -
Validate
kubernetes-vipservice is created and running the IP specified in the kubernetes/cluster.yaml file:kubectl get svc kubernetes-vip # Example output NAME TYPE CLUSTER-IP EXTERNAL-IP PORT(S) AGE kubernetes-vip LoadBalancer 10.43.7.188 192.168.122.100 9345:30094/TCP,6443:30921/TCP 20m -
Validate that nodes have connected in a cluster successfully:
kubectl get nodes -o wide

# Example output
NAME            STATUS   ROLES                AGE     VERSION          INTERNAL-IP       EXTERNAL-IP   OS-IMAGE                            KERNEL-VERSION            CONTAINER-RUNTIME
node1.example   Ready    control-plane,etcd   26m     v1.34.2+rke2r1   192.168.122.250   <none>        SUSE Linux Enterprise Server 16.0   6.12.0-160000.6-default   containerd://2.1.5-k3s1
node2.example   Ready    control-plane,etcd   13m     v1.34.2+rke2r1   192.168.122.251   <none>        SUSE Linux Enterprise Server 16.0   6.12.0-160000.6-default   containerd://2.1.5-k3s1
node3.example   Ready    control-plane,etcd   13m     v1.34.2+rke2r1   192.168.122.252   <none>        SUSE Linux Enterprise Server 16.0   6.12.0-160000.6-default   containerd://2.1.5-k3s1
node4.example   Ready    <none>               8m16s   v1.34.2+rke2r1   192.168.122.253   <none>        SUSE Linux Enterprise Server 16.0   6.12.0-160000.6-default   containerd://2.1.5-k3s1